Sunday 11 December 2022

Pickled pineapple with jalapeños and radishes - Sydney Royal Easter Show winning pickle recipe!

Easter Show Winning Pickled Pineapple

After several attempts since 2014, I finally reach the pinnacle of pickling - I got the Blue Ribbon at the Sydney Royal Easter Show pickling competition (Vinegar pickles - class 413)! 


The vinegar pickles category requires competitors to submit two different pickles.  My first pickle was a pickled pineapple.  The second was pickled fennel and beetroot.  It's been around 8 months since the Easter Show but I've finally got a bit of time to share the winning recipe!


I'd noticed in several previous Easter Shows, the winning entries had one pickled vegetable and one pickled fruit.  So if I was serious about getting the Blue Ribbon, and in the absence of a clear judging criteria, I decided to follow suit. 


I  came up with the idea to submit pickled pineapple after reading about Al Pastor tacos which has grilled pineapple on it.  I thought a pickled pineapple would go great on a pork taco, or with anything pork-related.  The spices and herbs included were Asian inspired to compliment the pineapple.  The red radishes transfer their colour into the pickle brine and give the pickle a nice orange/pink hue. 

I thought I'd also add a Filipino twist to the recipe by using coconut vinegar for the brine.  Coconut vinegar is available in most Asian grocery shops, particularly Filipino shops. 

Pickled Pineapple Recipe

Ingredients

  • A ripe pineapple, skin and core removed, cut into bite sized pieces.
  • A bunch of radishes (the red ones), sliced thinly with a mandolin.
  • Jalapeños (as many as you want), sliced thinly with a mandolin. 
  • A thumb sized pice of galangal, sliced thinly.
  • A thumb sized piece of ginger, sliced thinly.
  • Coconut vinegar, 1 cup.
  • Rice Vinegar, 1 cup.
  • Sake or rice wine, 1/2 cup.
  • Water, 1.5 cups.
  • 5 lime leaves (kaffir lime).    
  • Sugar, 4 tablespoons (or more if you like a sweeter pickle).
  • Salt.

Making the pickle

  1. One you've cut the pineapple into small, bite sized pieces, place it into a bowl with the radishes and jalapenos, cover them in about 3 tablespoons of salt, and make sure each piece is salted.  The salt will draw out some moisture from the fruit and vegetables.  
  2. Into a saucepan, add the coconut vinegar, rice vinegar, sake, water, lime leaves, ginger, galangal, sugar and 1 tablespoon of salt. Bring to the boil, ensuring all the sugar and salt are dissolved.
  3. Once some additional moisture has been removed from the pineapple and vegetables (about 2 hours), discard the extracted salty juice. 
  4. Place the pineapple, radishes and jalapeños into jars.  Add a lime leaf, some ginger and galangal slices into each jar.  
  5. Once each jar is filled, cover the jarred ingredients with the brine.
  6. The pineapple will last a month if you don't can the jars.
  7. If you want to can the jars, then boil the jars, ensuring the jars are submerged in boiling water, for 10 minutes.


Sunday 23 July 2017

Sloe Gin


After two and a half years in the pickling wilderness/cucumber patch, the Jarhead blog is back.

In the time since my last post, a lot has happened.  I left Sydney, moved to the UK and then moved back to Sydney again.  In between, I pickled and preserved some amazing British and European ingredients, and I'll be posting some of these recipes retrospectively (possibly trying to recreate them here in Australia).

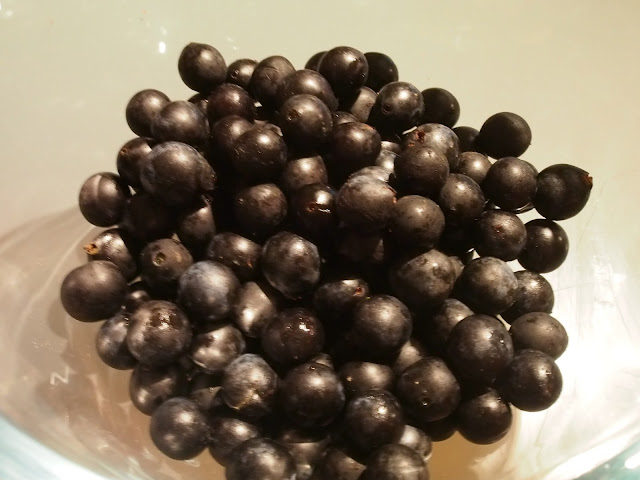
One of the best things I made while I was away was sloe gin.  Sloe gin gets its name from the fruit of the prunus spinosa, otherwise known as the 'Blackthorn'  plant (and not because it should be consumed slowly, nor because it's time consuming to make...but it does take a while).


I think sloes are quintessentially British.  They grow wild throughout the UK, in hedgerows and in the forest.  Sloes can't be eaten straight off the plant - they're tart and tannic.

Because I lived in the middle of the bustling London metropolis, Blackthorn bushes were not exactly plentiful in my area.  They're not something you can buy from the major UK supermarkets either (or at least I didn't manage to find any).

When you can't get your hands on fresh sloes, it helps to have a friend with a secret stash.  One of my work colleagues was visiting his family Winchester one weekend and managed to gather a sizeable haul of sloes, which he brought back to London for me.  He said that he found them while hiking in the New Forest, but I assume this was code for, "I found these sloes on my sprawling country estate while wearing tweed and hunting for pheasants".

I received some good tips on making sloe gin from a tour of the Sipsmith distillery in Chiswick. The tour was run by the head distiller.  While showing us their impressive copper stills, they described the process for making their sloe gin.  They mentioned that it's actually a myth that you need to use a pin to prick each sloe berry before soaking the berries in gin to extract the flavour.  They claimed that the best method is to freeze the sloes.  This breaks the tough skins of the sloes so that when they are added to the gin and begin to defrost, all of the flavour and colour permeates through gin.  Sugar is then added afterwards to taste.  Sipsmith have conveniently posted some of these tips on their website.

As far as I'm aware, sloes are difficult to find in Australia as they are native to the Northern hemisphere.  A good alternative for making flavoured gin would be damsons (which are small plums).  You can use the same process.


Sloe Gin Recipe


Ingredients

  • A 2 litre jar.
  • 1.5 litres of good quality London dry gin. I used Southbank London Dry Gin. 
  • Enough sloes to fill up half of the jar.
  • White sugar.

Method
  1. Wash the sloes and cut or pull off any remaining stalks.
  2. Place sloes in a plastic bag and place in freezer overnight.
  3. Place the frozen sloes into the jar, and then fill the jar up with your gin.  
  4. Leave to macerate and infuse for at least three months, occasionally agitating the jar.
  5. After three months, strain the mixture and discard the sloes.
  6. Make a simple sugar syrup (1 part sugar to 1 part water).
  7. Add the sugar syrup to the strained sloe gin to taste.  
  8. Place in old gin bottles for storage.
Serving Suggestion

Sloe gin is sweet in comparison to regular gin or spirits.  So I prefer to mix it with soda water (instead of tonic) and to add a squeeze of lime.


Sunday 8 February 2015

Kiwifruit Jelly


Another trip to Canberra and another haul of kiwifruit!

Back in July 2014, at the peak of kiwifruit season, I helped pick kiwifruit from my girlfriend's family vines.  They were particularly abundant last year due to the way they had been pruned at the end of the 2013 season - the fruit was practically falling off the vines.

Picking kiwifruit, particularly when the vines have been grown over a pergola, is pretty labour intensive.  I would try to be strategic, get up on the ladder, reach for a large bunch, and give it a good yank, but inevitably that action would cause the surrounding fruit to rain down, mostly straight onto my head. It's like be pelted with hairy golf balls.


The other issue with picking kiwifruit is that a lot of them are too small to be eaten, or might be bruised or partially chomped on by birds.  We went through a sorting process to discard the dodgy ones, and then sorted the rest into smaller and larger sizes.  The larger ones were set aside to eat fresh, and I decided to use the smaller ones to make a kiwifruit jelly.

I had previously made kiwifruit jam using store-bought kiwifruit.  The store-bought variety are much less hairy than the variety we picked, and due to this hairiness, it would be difficult to make a jam - a lot of hair could easily have ended up in the mix with the fruit.

A jelly, as opposed to a jam, is strained through muslin, so I thought it would be perfect to take the jelly approach to filter out any incidental kiwifruit hair that made its way into the mix while processing the fruit.


Picking the kiwifruit is only the first step.  The next is to wait until they ripen.  Surprisingly, it took about three weeks to ripen and soften enough that we could scoop out the flesh. If you store the kiwifruit with other fruit, particularly bananas, the ripening process will be much faster.

The recipe I used is an adapted Feijoa jelly recipe.  The ingredients of the jelly are really simple - some lemon juice is added into the mix to help bring out the pectin.

The resulting jelly is really refined and delicious, but has a fantastic tanginess.  It also spreads really nicely across a piece of toast, and is even better with fresh scones!


Kiwifruit Jelly Recipe

Ingredients

  • 2-3kg of kiwifruit;
  • water;
  • 1.5kg of white sugar.
Making the jelly:
  1. Wash the kiwifruit to get rid of any excess hair.
  2. Slice the kiwifruit in half.
  3. Using a spoon, scoop out the flesh of the kiwifruit into a bowl, discarding the skin.  Try to get a few people to help you - this process can take a while, particularly if the kiwifruit are small.  
  4. Place the kiwifruit flesh into a pot and add water to just below the level of the fruit. 
  5. Bring the mixture to the boil and then turn the heat down. Simmer the fruit mixture for around 40 minutes until the fruit has broken down (see photo above).
  6. Place a muslin cloth over a sieve and then strain the mixture through it.  Leave for a few hours until all of the syrup has been extracted.  If you push the mixture through it will affect the clarity of the jelly, making it more cloudy.
  7. Return the syrup to a new pot, measuring it as you go. Then add 3/4 cup of sugar into the pot for every cup of syrup.  
  8. Bring the mixture to the boil and reduce the mixture.  You will know when the jelly is ready by doing the cold saucer test (place a saucer in the freezer for 5-10 minutes until it is icy cold.  If you spoon a bit of the jelly on to the plate it should form a jelly-like glob rather than dispersing)
  9. When the jelly is finished, pour it into sterilised jars.  


Tuesday 6 January 2015

Pickled Cucumbers - Gherkins, Spears and Chips


Long time, no post! It's been a several months since I last posted something on Jarhead (work, uni and a butchery blog has been taking up all my time!) but rest assured the pickling has continued.  


With the start of summer comes the beginning of cucumber season.  Over the next few weeks I'll be posting about some different approaches I've taken to preserving cucumbers.


The last time I made cucumbers was in December 2013.  I had eaten or given away most of the jars, but I had one remaining.  I had stored the cucumbers in a mason jar and had processed it in a boiling water bath, so it should have been shelf stable. So I cracked it open and cautiously tasted the pickles - to my relief, they were still really juicy and delicious.  The canning had been a success! They had definitely fermented a bit and had changed colour into a deep khaki, but the cucumbers still had structural pickle integrity and hadn't softened or deteriorated.


Year old pickles
They were still delicious!
For this previous batch of cucumbers, I went to the Flemington markets in the middle of December, which is after the peak of the Kirby cucumber season so the supplies at the market were fairly sparse.  With this in mind, I decided to get in early this time, at the end of November, to scoop up the Kirbys at their best. 


That morning, Flemington markets was insanely busy with lots of families stocking up on produce for the holiday season.  Compared to last time when there was only one vendor selling Kirby cucumbers, there were actually several vendors offering them – the hard part was working out which ones had the prize cucumbers!


After circling the markets and spotting the cucumber vendors, I snapped up two crates of larger Kirby cucumbers from one vendor (I was lucky because they were his last crates!) These larger Kirby cucumbers looked like they had just been pulled out of the ground and had a bit of dirt on them, but nothing that couldn't be washed off.  They came in different shapes and certainly weren't aesthetically perfect, but I really don't mind having some weirdly shaped cucumbers - they add character to the batch and, in any event, they can be cut up into spears and chips to fill the gaps between the whole cucumbers.  

You need to look for a good size (smaller cucumbers are preferable as they tend to retain their shape and integrity once pickled), good colour (a nice shade of green with not too much yellow), not too much damage (but don't be turned off by a few imperfections), and firm feel – you don’t want a limp pickle! You can work around most of this, but just make sure the price you pay reflects the quality of the product.  


I lugged these crates back to the car, and was about to leave but had last minute cucumber remorse and decided I needed a few more.  One vendor, who was particularly popular that morning, was selling bags of smaller, almost perfect looking cucumbers.  So after buying an additional bag from that vendor, I ended up with around 10kg of cucumbers in total.  This came at a cost of $35, which was an absolute bargain.  

Driving back home, I was slightly worried that I had gone overboard on the quantity - how was I going to be able to process all of these cucumbers in one weekend? When stacked up together, the pile of cucumbers was monolithic! 


I wanted to give the pickled cucumbers to my family, friends and work colleagues as Christmas presents (I mean, who doesn't love pickles?) But as I started to rise and scrub the cucumbers, I realised that I would have enough cucumbers to give out as presents and still have a year's supply for myself!  

So I decided that I would process most of the cucumbers using the same recipe I used last time, but with slight tweaks to perfect it! Then, I would experiment and make a few different types of pickles, which I will post up on the blog in the coming weeks: 
  • Dill and Cucumber Relish;
  • Turkish style cucumbers pickled in lemon juice;
  • Fermented kosher pickles; and
  • Spicy Korean cucumber pickles.

Jarhead's Perfect Pickled Cucumber (Gherkin) Recipe

I decided to use the same recipe as last year to process most of the cucumbers.  While I thought that the 2013 batch was excellent, some sugar added to the brine would balance the flavour out.  


Processing the cucumbers is time consuming.  The first step of the process is letting the cucumbers sit in a salt brine overnight.  I had containers of cucumbers sitting all over my small apartment, which ended up smelling like vinegar for a few days - I might need to invest in one enormous container for next time.  

This part of the process really requires an extra pair of hands - or as many people as you can bribe to assist.  Between heating the pickling brine, sterilising and packing jars, and then canning the jars in a large pot, there's just too much happening simultaneously for one person to manage.  


But in the end I had more than 20 jars to give out as gifts.  For a simple way of making an old jar look presentable, or at least somewhat 'rustic' and folksy, we tied some Xmas pudding calico over the lids using standard brown twine.  They looked great! 


Another tip for those starting out  - labelling. I’ve found out the hard way how important it is to label your jars, at least with a manufacture date, but preferably also the contents - once you get a few batches going with different recipes it becomes very difficult to work out which is which. So invest in a label maker, or just a permanent marker!


Recipe


What you need:
  • 1.5 kg of Kirby pickling cucumbers;
  • 2 cups of apple cider vinegar;
  • 8 cloves of garlic, peeled and sliced (I like them to be really garlicky);
  • 1 teaspoon of fennel seeds;
  • 2 tablespoons of coriander seeds;
  • 1/4 cup of sea salt;
  • 1 bunch of dill;
  • 1 tablespoon of peppercorns;
  • 3 tablespoons of sugar;
  • 6 cups of water.  


The pickling:
  1. Place the water in a pot and on a low heat, dissolve the salt, peppercorns; coriander seeds, and fennel seeds.  Set this brine aside and allow to cool to room temperature.
  2. Wash and scrub the cucumbers well, making sure there's no spines or dirt.  
  3. Slice off a thin round near the blossom end of the cucumbers.   The blossom end contains an enzyme that can lead to the softening of the pickles.  For any oddly shaped cucumbers that won't be easily packed into a jar, slice them into circular rounds (chips), or cut them lengthways into spears (quarters or halves).  These chips and spears will be good for filing the gaps in a jar between the whole gherkins.  
  4. Place the prepared cucumbers in a large plastic container and then cover in the cooled salt brine. Also add in a handful of dill. You can weigh down the cucumbers with a plate to ensure they're submerged.  Leave them in the brine for 24 hours in the fridge or at room temperature.  
  5. 24 hours later, measure out 2 cups of brine and put it aside.  Sieve the rest of the brine and save the peppercorns and other aromatics.
  6. Then, pack the cucumbers into your clean, sterilised jars.  As you pack them in, add in a sprig or two of dill in each jar along with some slices of garlic.    
  7. Mix the vinegar and the reserved brine in a pot and bring to the boil.  Add in the sliced garlic.
  8. Pour the boiling hot pickling brine over the pickles.  
  9. For long term shelf storage you can process the jars in a boiling water bath for ten minutes.  See the recipe in my post about Caramel Apple Jam for more information about processing jars in a water bath.

Tuesday 9 September 2014

Morgan's Strawberry Jam

by guest blogger and expert jam technician, Morgan Went


This is the second time in a week that I have made this batch of jam - it’s pretty popular and one of the easiest I have ever made. This recipe makes around 7 small jars.

Strawberry Jam

Ingredients:
  • 1kg strawberries
  • 1kg jam setting sugar
  • 1 lemon, juiced
Method:  
  1. Wash, hull and cut the strawberries.
  2. Add to a large heavy based saucepan with the sugar and lemon juice.
  3. Stir over high heat dissolving sugar.
  4. Bring to a boil.
  5. Boil 4 minutes, skimming the foam as you go, stirring occasionally.
  6. Test to check if it has reached setting point, continue to boil until this has been reached.
  7. Pour into sterilised jars.
Cut the strawberries as small as you like, they do cook down quite a bit. I like a mixture of different sized pieces, some people mash them a bit.

Sterilising Jars 
by far the easiest method to me is putting the jars and lids in a baking sheet in a low oven, leaving them while you make the jam. I lay foil or baking paper underneath mostly for any spills when filling the jars.
Setting 
This is the first time I have used additional pectin in my jam making. I’ve been a bit of a purist in the past but thought I might give it a go in the form of jam setting sugar. Let me tell you, this stuff works a treat! It’s sugar with apple pectin and citric acid, good for fruits low in pectin like strawberries, plums, peaches, figs… pretty much any fruit you want to make into jam, I suppose. The lemon in the recipe is be helpful to the setting process if there was no added pectin, so it’s kind of unnecessary now but I like it for the flavour, it lifts the strawberries (Jamie Oliver uses vanilla which I think would be too sweet, even for jam). 

I use both a sugar thermometer and the saucer-in-the-freezer technique to help me check if the jam will set. Jam setting point is 104°C or 220°F.

For the saucer menthod, put a saucer or two in the freezer when you begin the recipe. To test the jam, put a spoonful on the cold saucer and leave it for about half a minute. If it wrinkles when you put your finger through it it’s setting well and you can stop the boil.
Boiling
Apparently if you overcook strawberry jam the colour and flavour go downhill pretty quick - I’ve never boiled it for longer than 4-5 minutes and it’s fine. I believe 12 minutes is the breaking point but I’ve never tested that!
Skimming
This removes the ‘scum’ that appears when you make any kind of jam, can be a dirty colour (like when making plum jam) but strawberry jam scum looks more white. It’s the foam on top (as opposed to the bubbles from the boil). I like to skim as I go when the jam is boiling - it gives me something to do while I’m keeping an eye on it, and every now and then I remember to stir the jam in case any fruit is catching. You can skim at the end if you like.
Pouring 
I find it easiest to use a soup ladle to pour some jam into a measuring jug for easy pouring into the jars. Put the lids on pretty soon to seal, use a tea-towel on your hands, though!

Photography and Words by Morgan Went